Software Testing With Testopia
http://mozilla.org/projects/testopia
Greg Hendricks
IS&T Engineering Tools
ghendricks@novell.com
Welcome to Testopia
-
Testopia is a test case management extension to the Bugzilla bug tracking system.
-
It is an open source project licensed under the Mozilla Public License.
-
The project home page is http://mozilla.org/projects/testopia
-
Testopia allows developers and testers to work in a single environment to produce better software.
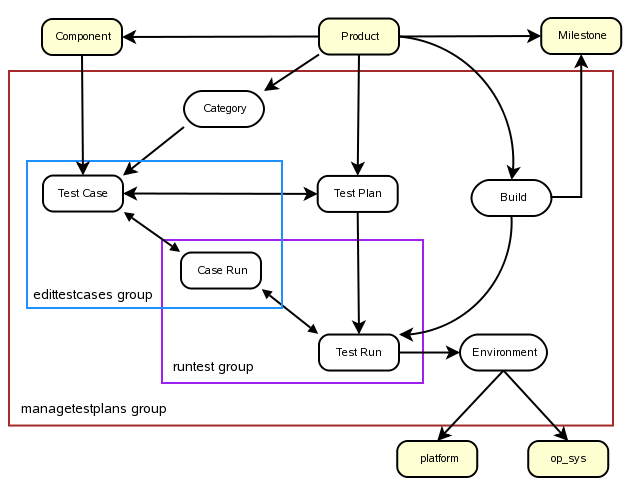
Testopia Big Picture
Test Plans
-
Test plans are the glue of testopia
-
Each plan may belong to one Product and Product version
-
A test plan contains the document detailing what type of testing is to be performed and gives an overview of acceptable parameters.
Creating a Test Plan
-
Click the “New Plan” link in the footer
-
Enter a name for the plan
-
Select a product and version
-
Select a type
-
Add details to the plan document
-
Click “Add”
Viewing a Test Plan
-
Overview – displays details about the plan
-
Command buttons – Various commands for a test plan
-
Categories and Tags – Add categories, builds and tags
-
Test Cases – View a table of test cases associated with this plan
-
Test Runs – View a table of test runs of this plan
-
Attachments – View a list of attachments to this plan
-
Reports – a list of reporting options for this plan
-
Attributes and Document – edit the plan
Access Controls
-
Testers group has all rights
-
Individuals can be added to plans one at a time or via regular expression
Creating Categories
Categories are used to classify test cases. They are associated with a product which means you can add them or edit them in any plan in that product and see them in all plans for that product. You must have at least one category before creating test cases.
-
Click “Add” under categories
-
Give your category a name
-
Provide a description
-
Click “Submit”
Creating Builds
Builds are periodic snapshots of your project. When running tests you will typically run them against a particular build. Each build can be associated with a Target Milestone. You must have at least one build defined before creating runs.
-
Click “Add” under Builds
-
Enter a name or build string
-
Select a milestone
-
Provide a description of the build
-
Click “Submit”
Creating Environments
Environments are the set of conditions within which you run your tests. Environments are global so you can reuse environments across products. You must have at least one environment defined before creating a run.
-
Click “Environments” in the footer
-
Click “Create”
-
Enter a name for your environment
-
Click “Submit”
-
Drag and drop elements
Creating a Test Case
-
Click the “Create a New test Case” link on the plan page or the “New Case” link in the footer.
-
Enter a summary
- The summary is a short description of the test case
-
Enter a default tester
- This defaults to you, the one creating the test case, however you can enter any Bugzilla user here.
-
Alias (optional)
- The alias field is a globally unique string that can be used in place of the case id to find your test case.
Creating a Test Case (continued)
-
Select a status
- PROPOSED – Not yet ready to be included in runs
- CONFIRMED – Can be included in runs
- DISABLED – No longer relevant for use in runs.
-
Set the Priority
- Same list as bug priority
-
Select a category
- Defined from the plan page
-
Enter a requirement (optional)
- An id for a requirement in an external requirement tracking system.
Creating a Test Case (continued)
-
Select Manual or Automatic
- If automatic, space is provided for a path to a script and related arguments which the tester would then need to run.
-
Depends on (optional)
- a list of test case ids that this test case requires to have tested before this one can be
-
Blocks (optional)
- A list of test case ids that this test case prevents from being tested until this one is tested.
Creating a Test Case (continued)
-
Action
- The list of steps the tester would go through during a run to test the feature or bug this test case represents.
-
Effect
- The list of expected results or outcomes that the tester uses to verify that the feature or bug this test case is for works as intended.
-
Setup
- The things that need to be done before the case is run.
-
Breakdown
- Steps to reset this case for the next run
-
Click “Add”
Viewing a Test Case
-
Overview – displays details about this test case
-
Command buttons – Executes different options for this test case
-
Components
- Each test case can have zero or more Bugzilla components associated with it. The list comes from the plans’ products this case is linked to.
-
Case Run History
- A table listing the outcomes of this test case in each run it has been included in.
Test Runs
-
Test runs are the actual place where testing happens.
Creating a Test Run
-
Click the “Create a New Test Run” link on the plan page or the “New Run” link in the footer.
-
Select the test cases to include in the run.
- Check the boxes next to each test case to be included or use the select all link at the top to grab all of them.
-
Select a product version for this run.
-
Select a plan version
- This is the version of the plan document that is to be used for this run.
-
Enter a plan manager
- This can be anyone with a Bugzilla account.
Creating a Test Run (continued)
-
Select an environment
-
Set the status
- Running – can change the status on test case-runs in this run
- Stopped – Updates of test case-runs are not allowed.
-
Select a build
- This will be the default build for all case-runs in this run. You can edit builds on the plan page.
-
Enter a summary
- A quick description of this run
-
Notes (optional)
- Allows you to make notes about this run
Viewing a Test Run
-
Overview – same as before
-
CC list
- You can add people to the notification list for this run
-
Coverage
- Lists how many test cases are in each state in this run
-
Test Case Run Logs
- Displays one entry for each of the test cases selected when creating the run
-
Attributes
- Allows you to update the fields of this run as well as add notes.
Running Tests
-
Test Case-Runs
- For each test case selected in a run an entry is made in the test case-run. This is where you will pass and fail test cases.
-
Expand the test case-run form
- Click on the black triangle or the status icon in the row you wish to update
-
Select a Build
- If the build I am testing against is not the same as the one chosen for the test run, select the appropriate one now.
-
Perform the action and verify the effect
- Follow the instructions in the action and compare the results to those listed in the effect as expected outcomes.
Running a Test Run (continued)
-
Select a status
- IDLE – Test case has not been run
- PASSED – Expected results were obtained
- FAILED – Did not perform as expected
- RUNNING – Test is in progress
- PAUSED – Test was started but is not actively running
- BLOCKED – Test is blocked by the failure of a dependent test case
-
Add notes (optional)
- You can make a note about this test case
Running a Test Run (continued)
-
Attach bugs
- If a test case failed you may wish to attach one or more bugs to this test case-run. Click the new button to log a new bug or enter the bug id of the existing bug(s) you wish to associate and click attach. If you log a new bug, the bug will automatically be associated even though you will not see it in the bug list until you refresh the test run.
-
Reassign the test case-run
- You can assign this test case in this run to a different person by entering their Bugzilla login name here and clicking assign.
-
Adding additional test cases
- Click the “Add Cases” link to add further test cases to this run
Tags
-
Tags are user defined text strings that can be used to further classify your test cases, runs and plans
-
To add a tag to an object type the tag into the tag field and click add
-
To remove a tag click the X next to the tag in the list
Viewing History
-
You can view the history of changes to Test cases, runs and plans by clicking the History buttons in their respective pages
-
A table of what changes were made by whom and when will be displayed
-
On the test case and test plan history pages you can view a diff of changes to the documents for these objects.
Cloning
-
Test cases, runs and plans can all be cloned.
-
A clone is an exact replica of the object
-
Runs can be cloned within a plan.
-
Plans can be cloned with their associated test cases being brought forward
-
Cases can be cloned or linked to additional test plans
- in the case of a link, the case is associated with multiple test plans. Updating the test case in one will mean it is updated everywhere.
Searching
-
You can search for test cases, plans, and runs individually.
-
Testopia uses the Bugzilla search engine which makes detailed searches possible.
-
Results are paginated and sortable
Updating Multiple Objects at Once
-
Lists of test cases, runs, plans, and case-runs can be updated at once from their respective search results pages.
-
Select the objects you wish to update and fill in the form data at the bottom then hit “Commit”
Reporting
-
Reports can be run on cases, runs, plans, or case-runs
-
Generic reports
-
Specific reports
-
Work in progress
Testopia Project
-
http://mozilla.org/projects/testopia
-
Developers and Contributors
- Greg Hendricks <ghendricks@novell.com>
- Vance Baarda <vrb@novell.com>
- Justin DeVries <judevries@novell.com>
- Ed Fuentetaja <ed.fuentetaja@gmail.com>